Showing posts sorted by relevance for query potholder. Sort by date Show all posts

Friday, March 11, 2022

Potholder/Pincushion Sample Project & More with our Blossom & PiX Smart Grid Printed Interfacing! SUPER QUICK GIFTS!

Our Potholder/Pincushion Sample Project can expand far beyond that with a little imagination!...and a few hacks!  Please share yours with us on Facebook, Instagram, or send them to info@quiltsmart.com.  We would LOVE to see what you CREATE! 

Potholder BASIC Instructions:  Sample Projects: Potholder 

HACKS & MORE Projects... keep reading!

St. Pat's Day themed potholder & EASY St. Patty's Meal crockpot RECIPE (from my cookbook, "A Quilter in the Kitchen":  Potholder & Recipe


BASIC "Blossom" Applique

Rough side of interfacing to RIGHT side of Fabric.  Stitch on the line, trim on the line, turn, fuse, and zigzag.  The basic instructions linked above give more detail.


PINCUSHION / Sheep SACHET BLOSSOM HACK:
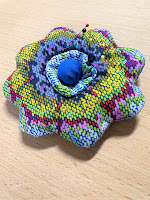
1]  Layer two fabrics RIGHT sides together.  Amanda fussy-cut FreeSpirit Fabric! Use a terry towel for a fluffy sheep!
2]  Cut center circle out and set aside. Fuse blossom interfacing to WRONG side of one fabric piece.
3]  Stitch solid line, inserting fabric scraps for sheep feet, trim dashed line.

4]  Make a small slit under where you want the circle to be (flower center in pincushion or head in sheep).  The slit needs to be smaller than the circle, as the circle will cover the slit.  Turn gently through slit. Smooth edges with a blunt tool.  Pointer-Creaser 

5]  Stuff with glass beads, walnut shells etc (I used kitty litter that is 100% walnut shells).  Stitch up opening.  For SACHET:  put a few drops of perfume or essential oils inside.  Check out instructions from manufacturer.

6]  Stitch center interfacing piece (that you set aside) in the same way as the flower.   Position over slit. Hand-stitch around circle edges for the sheep, tucking in fabric scraps for ears.  Leave it free as in the blossom below!  NOTE:  The sheep face can be made without the second piece of fabric - but, then you put the interfacing ROUGH SIDES to RIGHT side of fabric. 

7]  Embellish as you wish.  A cotton ball or batting covered with fabric OR a button for flower center. Embroidery for sheep face & a heart or shamrock.
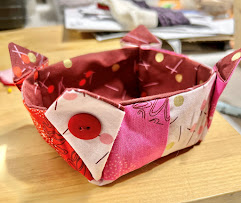


SWEET LITTLE BOX

Katie, age 12, made this adorable little box. 

1] Make potholder as in BASIC Instructions:  Sample Projects: Potholder

2] Fold diagonally with the squares on the outside.  Stitch along the seams marked here with the green lines.

3] Fold the other diagonal and do the same.

4] For buttons, pinch the outside crease of the fold inward toward the box and sew on a button.  


  BLOSSOM DOOR GREETING

1] Make potholder and blossom as in BASIC Instructions:  Sample Projects: Potholder with the exception that you will adding half-square triangles for leaves and pot bottom.  Watch our PiX Smart Grid VIDEO to see how easy those half-square triangles can be!

2] Cut the top of sky 6" x 9"  (this is a bit oversized for some fudge factor).  Sew the sky to the grid with a 1/4" seam allowance.

3] Zigzag stitch the flower to the piece in step 2.

4] I used a small piece of fabric to create the stem and hand-stitched - but there are many other ways to do this.  One of my favs is YLI Braid.


Our first potholder - two sided, so you get a great little project and learn 2 Quiltsmart methods - The ZigZag Applique, and EASY Fuse & Stitch Patchwork!  Same BASIC instructions: Sample Projects: Potholder


Happy Creating....!

Enjoy,

Mattie


Sunday, March 15, 2020

FREE Fusible Brochure & Sample Project - Blossom Potholder


A Fusible Brochure Potholder Project is free with any order and available at many quilt shops.  Email us at info@quiltsmart.com to request more for shops, classes, or guilds.

There are basic instructions on the panel.  This Blog Pictorial gives more detailed AND updated instructions.
 
Enjoy the freebie! 

Mattie

This project was a team effort.  Lavelle Wallace (Social Media Manager) designed the project for a staff challenge that was, "Design a quick project using at least 2 Quiltsmart designs and 2 different methods".  Terri is Quiltsmart's Customer Service Manager and did the sewing and the photos for this post.  Mattie wrote the instructions and is Quiltsmart's Founder & Pres but mostly loves Creative.  

The potholder has our ZigZapps Blossom & Petals on one side, and  The Original Fusible 2.5" Grid Panel on the other.  These are 2 great examples of the Quiltsmart Methods.  

You could also use this freebie to create 2 potholders - just use the insulating batting on the backside of each instead of the 2 together.


MATERIALS NEEDED:
Flower Center: (1) 3”  square
Flower: (1) 6” square
Flower Background: (1) 9” square (allows fudge factor)
GRID: (16) 2.5” squares 
(1) 9” square insulating batting
Hanger:  2" x 5" rectangle

INSTRUCTIONS:
1) Cut out the flower on the outside circle dashed line.  In the middle of the center circle, there is a dotted line.  Slit  along that.
2) Place the interfacing piece rough side (glue dot side) to RIGHT side of the center circle fabric.   The flower interfacing will hang over the edges of the center circle fabric.


Stitch on the solid line around the center circle.


Make a small slit along the dashed line around the circle.


Place your scissors in that slit and continue to trim on the dashed line, freeing the flower interfacing piece.


Turn the center gently through the slit.  Use a pointer-creaser to smooth and round the seam.


 Follow the same procedure for the flower - place, stitch, trim, turn.


3) Layer the flower and center, fuse using a Quiltsmart Pressing Sheet.


Zigzag (”zigzapp") around the circle edges. Set aside.


4) Fuse the 16 squares to the interfacing, centering them between the dotted lines.  The Quiltsmart Pressing Sheet. will help at this step and later when fusing the batting to the square.  It helps keep the pieces in place, and it helps from getting excess fusible on your iron.  It is also a lightweight sheet so you can see your work through it.


Stitch the lines in one direction.


Clip to the stitching at each intersection.


Stitch in the opposite direction alternating the seam allowances up and down.


 5) HANGER: Press 2 x 5" strip in half to crease the lengthwise middle.  Open and fold the long sides to that crease.  Press again.  Now fold in half, encompassing all raw edges.  Press again.


Stitch the folded side closed.  You may stitch the other side if you wish.  Fold the hanger in half and stitch in the corner or close to the corner.


6) Center and pin (or fuse) the insulating batting to the wrong side of the Blossom block.

Center and place the Blossom block right sides together to the grid.  From the grid side, stitch on the solid line around all sides leaving the opening to turn.  Trim t even all edges with the raw edges of the grid - I leave a little extra where the place to turn is so that there is more to turn under.  Turn.  Top-stitch, encompassing the opening.

If you like this potholder, and are okay with the zigzag arround the Blossom showing through to the grid, there is an alternate nice technique. It allows you to sew all around the potholder, and turn it underneath the Blossom which is then put on after turning.
Lucky Heart - A Quiltsmart way to turn an applique with beautiful edges.

March 2022.  For updated hacks & more projects with the Fusible Brochure, go here!  More projects with the Sample Project Potholder - not just potholders!

(c) Copyright 2020, Quiltsmart. Inc.  All rights reserved.  May not be copied or sold without permission of Quiltsmart, Inc.


Potholder for a Pot of Gold (Recipe included!)

There is a winter snow warning and we are pretty much snowed in tonight with a white out. (Side note: My son, Marty was born on March 17, on a day just like this!)
So I am challenging myself to make a small project -and of course, not leave my house.
I just had to have a St. Pat's Day rainbow theme....so....  I had to dig and dig for all the ROYGBIV colors.  I found most and there is even one flannel in there.  The challenge to myself was that I finish this now.  I did it!  Now to get more fabric, well after the storm! :)
 
Our potholder is dolled up with scraps for a St. Patty's Day Rainbow which will undoubtedly end up going into a Pot of Gold - or, more likely holding a Pot of Corned Beef & Cabbage (which is as good as gold to me!).  A perfect use for scraps and our potholders!

A two sided potholder (or make 2 one-sided).


Here is my mom's recipe as well!

Irish Corned Beef &Cabbage              
slow cooker

I texted my mom the Sunday before St. Pat’s Day:  “Mom, I need a corned beef recipe I can cook in the slow cooker in 5 hours”.

Thanks, Mom!  (Nancy Donnelly)


INGREDIENTS:
3 lbs Corned beef brisket
Cabbage
Frozen or fresh:
1 pound baby carrots
Potatoes  (red, I like to buy them already cut and washed - or canned)
1 can of beer
Seasoning:  May come packaged with the meat.  If not, rosemary and dill are great.

INSTRUCTIONS:
Thaw meat following safe handling instructions, or buy fresh when you get the cabbage. 
Mom’s words: “Throw it in the slow cooker now with a can of beer.  Don’t rinse it.  Set slow cooker for 5 hours on high. Add potatoes and carrots after 2 hours.  Add chopped (wedges) cabbage last half-hour.”
My tip:  If you decide to add the cabbage after the 5 hours (ok to do, like once guests arrive), make sure the slow cooker is still on!
Serves 6.


Monday, March 30, 2020

Really Cool Method for Using Appliques over the "Leave Open to Turn" Slit.

On this blog, I am going to explain this technique which I created to make the edges easier to sew and much nicer than when the project is turned through the outside edge.
You can sew around a potholder or placemat, leave an opening through the outside edge, turn it right out, press and whipstitch or tuck and machine sew - and struggle with getting it to look as great as the rest of the edge.  OR..... you can do what we did in our Placematties - so that you get a beautiful curved edge.
Placematties with Bunnies & Carrots

The teal part of the placemat is turned right side out before the yellow inner section is placed.  The slit to turn is in the teal section, under the yellow applique. Beautiful wavy edges!
 This sweet little bunny was stitched all around the edge - right side of fabric to printed interfacing pattern, and turned right side out.  He is turned through his bum, and then his tail is zigzapped (Quiltsmart method for easy applique) on top, covering the area where he was turned.
 This project was shown in our potholder class - Quiltsmart LIVE!
To use this edge method, set the applique aside.  Place the heat-resistant batting to the wrong side of the background.  Make a slit in the applique background through the batting where you are going to be placing the applique.  So, the slit needs to be small enough to be covered when the applique is put on top.  Put the background right side together with the other side (in this case, the grid work).
Layer the heat-resistant batting against the background - not the grid. 
 Sew on the solid line ALL the way around the project, continuing to stitch right through the "leave open to turn" section.
 Turn through the slit.
Place the applique over the slit and fuse it in place. Stitch with a 2mm width and a 2.5mm length.  Change either of those as you see fit.  Be careful of getting the length too long.

I hope that helps!  If you have any questions, you can reach out to us at info@quiltsmart.com.

Enjoy and Take Care!
Mattie

Sunday, February 2, 2020

Hearts & Crafts - Project #7: Potholder

Welcome to Mattie's Hearts & Crafts Blog Series! 

To see all projects in this series, click on the label "Hearts & Crafts Projects".


This potholder would be a welcome hostess gift, and so quick to make!  Have fun! 
STANDARD METHOD:  Zigzag Applique, "Zigzapping" 
NOTE:  This project does not use the small heart, so I just left it in.  You could cut it out as in some of the other projects if you wish to use it.  If you do, it is helpful to sew it first, then cut on the dashed lines.  See Crazy Heart Runner, Steps 3-6

MATERIALS:
 6.5" square  for heart applique.
2" x 5" strip for hanger.
9" square for background
9" square backing (you can use an old ironing board cover - silver quilted fabric, heat resistant)
9" square fusible fleece  (if your heat resistant fabric above includes batting, you might not need this - your choice)
1 Quiltsmart Sweet Hearts heart ( a little redundant)

INSTRUCTIONS: (Read first to get the gist of it!)

1) Cut fabrics as listed.


Cut a small slit in the middle of the small  heart.


2) Place interfacing rough side (glue dot side) to RIGHT side of fabric.  Stitch on the solid line.  TIP:  The smaller the stitch, the smoother the curve.  I used a 2.0mm on this project.

3) Trim on the dashed line, clipping at the center inner angle.


4) Turn right side out.  Use a pointer-creaser to get a great smooth line and points.  Keep the tool in between the fabric seam, not next to the interfacing! TIP:  I like to use the rounded end of the pointer-creaser first, then the pointed end. Be very careful! Set aside.

5)  Fuse the fusible fleece to the background square. Your Quiltsmart Applique Pressing Sheet will help with fusing the batting to the square.


Turn over and cut a small slit - about 3" long - in the middle.  The heart will go over this.
6) HANGER: Press 2 x 5" strip in half to crease the lengthwise middle.


Open and fold the long sides to that crease.  Press again. 
Now fold in half, encompasing all raw edges.  Press again.  Stitch the folded side closed.  You may stitch the other side if you wish. 
Fold the hanger in half and stitch in the corner or close to the corner (as I have).  I don't like the bulk created in the corner, that is why I stitch is close to the corner.  I also like to separate it a bit, also to alleviate bulk. Stitch across, within the seam allowance.


7) Sew the insulated side and the hanger side, right sides together using a 1/4" seam allowance.

Use a pointer-creaser to gently push out the corners.

8) Fuse the heart to the center (we have over 30 ZigZapp designs - you could use many of them!), covering the slit.  ZigZagg stitch around the edges of the heart.  Keep the stitch on the heart, with the needle just piercing the background fabric.  I like a 1.5"mm width and a 2.5" mm length, but use what feels comfy.  This stitching will show on the backside - the heat resistant side.

9) "Top-stitch" around the outside edges.  Use the edge of your presser foot as a guide.  This will give a nice finished appearance.
Clip threads, ENJOY!
 
NOTE:  The technique used in this project is to cover the slit (step 8) with an applique instead of the more traditional approach which is to leave a side opening and whip-stitch by hand the opening shut.  This allows a very nice and structural outer seam, and no hand stitching.  The zigzag stitches will show on the backside of the applique.  I hope you like them, I do!

FUN OPTION:  You may quilt around the heart for more detail. This will show to the backside also, as will traditional quilting.


Please send any comments or questions to info@quiltsmart.com, Facebook, or Instagram.  Thanks so much!
I hope you enjoyed this project, send us pics to share!
Take Care, Mattie