
Our Potholder/Pincushion Sample Project can expand far beyond that with a little imagination!...and a few hacks! Please share yours with us on Facebook, Instagram, or send them to info@quiltsmart.com. We would LOVE to see what you CREATE!
Potholder BASIC Instructions: Sample Projects: Potholder
HACKS & MORE Projects... keep reading!
St. Pat's Day themed potholder & EASY St. Patty's Meal crockpot RECIPE (from my cookbook, "A Quilter in the Kitchen": Potholder & Recipe

BASIC "Blossom" Applique
Rough side of interfacing to RIGHT side of Fabric. Stitch on the line, trim on the line, turn, fuse, and zigzag. The basic instructions linked above give more detail.
PINCUSHION / Sheep SACHET BLOSSOM HACK:
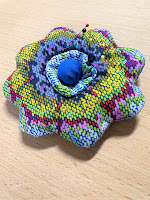
2] Cut center circle out and set aside. Fuse blossom interfacing to WRONG side of one fabric piece.
3] Stitch solid line, inserting fabric scraps for sheep feet, trim dashed line.
4] Make a small slit under where you want the circle to be (flower center in pincushion or head in sheep). The slit needs to be smaller than the circle, as the circle will cover the slit. Turn gently through slit. Smooth edges with a blunt tool. Pointer-Creaser

5]
Stuff with glass beads, walnut shells etc (I used kitty litter that is
100% walnut shells). Stitch up opening. For SACHET: put a few drops
of perfume or essential oils inside. Check out instructions from
manufacturer.
6] Stitch center interfacing piece (that you
set aside) in the same way as the flower. Position over slit.
Hand-stitch around circle edges for the sheep, tucking in fabric scraps
for ears. Leave it free as in the blossom below! NOTE: The sheep
face can be made without the second piece of fabric - but, then you put
the interfacing ROUGH SIDES to RIGHT side of fabric.
7] Embellish as you wish. A cotton ball or batting covered with fabric OR a button for flower center. Embroidery for sheep face & a heart or shamrock.
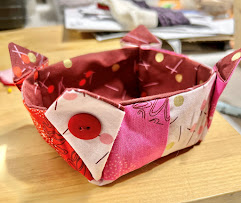
SWEET LITTLE BOX
Katie, age 12, made this adorable little box.
1] Make potholder as in BASIC Instructions: Sample Projects: Potholder
2] Fold diagonally with the squares on the outside. Stitch along the seams marked here with the green lines.

3] Fold the other diagonal and do the same.
4] For buttons, pinch the outside crease of the fold inward toward the box and sew on a button.

1] Make potholder and blossom as in BASIC Instructions: Sample Projects: Potholder with the exception that you will adding half-square triangles for leaves and pot bottom. Watch our PiX Smart Grid VIDEO to see how easy those half-square triangles can be!
2] Cut the top of sky 6" x 9" (this is a bit oversized for some fudge factor). Sew the sky to the grid with a 1/4" seam allowance.
3] Zigzag stitch the flower to the piece in step 2.
4] I used a small piece of fabric to create the stem and hand-stitched - but there are many other ways to do this. One of my favs is YLI Braid.


Our first potholder - two sided, so you get a great little project and learn 2 Quiltsmart methods - The ZigZag Applique, and EASY Fuse & Stitch Patchwork! Same BASIC instructions: Sample Projects: Potholder
Happy Creating....!
Enjoy,
Mattie
