
HOME of the MONDO BAG! CLEARLY the SIMPLEST, most FUN patterns PRINTED on interfacing! #sewing #quilting #quilt #diy
Friday, September 26, 2025
Tuesday, August 5, 2025
TranQUILTity Ocean Waves
Tranquil Ocean Waves

Friday, March 22, 2024
Step into Spring with Quiltsmart Inspired Jeans!

I was poking around in Pinterest and was inspired by the hundreds of jeans that were embellished with quilted blocks. I happened to have a few of those!!!

So, I decided to fancy-up my jeans! The knee of my favorite pair got ink on them, so they were perfect for this project!
It is very EASY, but here are some tips!
After the TIPS, is a tutorial for using typical shapes, like hearts & flowers.
For Dresden Plate and Double Wedding Ring, watch the videos at quiltsmart.com. Both of those patterns - and MORE! - are available in Packs, Instructions Only, and interfacing by the panel.

TIPS for Quiltsmart Inspired Jeans!
GATHER & PLAY: Gather up your jeans (old or not) and place your shapes on them...move them around until you are happy. Take pics of different layouts. The pics are great to tell if you like one layout or another. Think outside the box! Maybe you want a shape inside the pocket, just for you to generate a little smile! Julie cuffed her jeans so the shape shows on the cuff. I put one at the bottom of the pant leg so when cuffed it peaks out from the cuff. Consider adding beads and embroidery! And, buttons. Oh, so much fun!
PIN & TRY O N: Amazing what you learn here! I moved the double wedding ring piece on the back pocket so it wasn't pointing to my bottom. In the picture, the jeans are folded over so you can see the back pocket with the double wedding ring arc.
CUT BLOCKS: I didn't want the whole Dresden Plate as I am short and it
covered the whole leg from knee down. So, I cut it in half. I
know, a little "ouch" there - but I was going for the greater good as it
has sat in my "to do" box far too long. I would suggest to pin & try on before you cut the blocks. Or, maybe you are sure that you want to cut a block in half or quarters and use it in a variety of places on the jeans. The other half of the Dresden Plate is on my design wall, waiting for another inspiration.
OPEN SEAMS & REMOVE POCKETS: Seams on jeans can be double-stitched. Those are a little tough to open up, but can be done. Watch a good movie. I try to work with the seam that is not double-stitched (usually there is one) as in the Dresden Plate above. I partially removed some stitches on the pocket to accommodate the double wedding ring arc - I did not remove the whole pocket. If you have a tight spot for machine sewing, you could hand-sew making sure that you do a nice short stitch so it will hold up while wearing and washing.
APPLIQUE (french word for "to apply"): Zigzag the shapes on the jeans. Or, use a decorative stitch as in the heart above.
RESTITCH: Restitch the jean seams, using jean thread for any top-stitching. Jean thread is the color of the gold/yellowish thread that is common in jeans. It is a subtle finishing technique, but nice.
WEAR & STEP OUT!

In general (more info and videos at quiltsmart.com), to make the appliques:
Cut out the shapes. Leave a
generous amount outside of the shape as it will be trimmed later.
Slit the center.
Place the interfacing rough side to right side of fabric.
Stitch on the SOLID line.
 Trim on the DASHED line.
.jpg)
Turn, using a pointer-creaser to gently push out any points and to round curves.


Fuse to your project. Use a pressing sheet!
Zigzag around the shape. Note the fussy-cut on the heart shape in the picture. "Awesome" is subtle, but nice!
Now.... drum roll ... STEP OUT & ENJOY your Quiltsmart Inspired Jeans!
Love you,
Mattie
Friday, October 13, 2023
Mondo Boo (Ghost Door Banner from a Mondo Bag Rectangle)
Mondo Boo
Make this cute door banner/tablemat from a Mondo Bag Rectangle. These instructions are basic instructions for the ghost, with more detailed method instructions found at the links below.
.jpg)
Thursday, September 21, 2023
Blossom Mug Mat

A super simple, adorable, and quick project!
I used FreeSpirit Fabrics. I love to travel, so I fussy cut the map fabric to one of my favorite places! This would be a great fabric to use for your friend who loves to travel or loves maps!
Materials:
Blossom & Petals Printed Interfacing Pattern (2 flowers per panel)
(2) 6" squares fabric for mat top and bottom.
(1) 3" square fabric for flower center.
(1) 6" square stabilizer. We love Annie's Soft and Stable. Fusible batting works, too.
MUG MAT INSTRUCTIONS:

 1) Cut materials. Cut around Blossom pattern about a half inch outside of lines. One of our complimentary project panels (with each order) had a dashed line around it that you can cut on. The Zigzap panel has the circle outside of the blossom - any of these configurations are fine! Cut a small slit in the middle of the flower center interfacing. Cut the center circle of the blossom away (about a quarter inch away from the dashed line) and place rough side (fusible side) to RIGHT side of flower center fabric. Set aside circle.
2) Fuse the rough side of the Blossom pattern to the WRONG side of top fabric. Put a small slit in the middle where the interfacing circle was (the circle will cover this, so make it small - about 1").
3) Layer the 6" square fabrics according to this photo.


.jpg)

4) Stitch on the solid line through all layers.

5) Trim on the dashed line. Clip at each inner angle - just a little, and do not go all the way to the stitching - just close.
.jpg)
6) Turn through the little slit that you made. Using a Pointer-creaser, through the slit, gently press against seams to smooth and push out the curves. Press with iron.

7) Sew the flower center on the solid lines. For the best smooth curve, use a very small stitch length - I like a 1.8mm, but see what you like. Trim on the dashed lines. Turn through the slit. Smooth curves with a pointer-creaser.

8) Fuse flower center to cover the slit on the Blossom. Zigzag around the flower center through all layers.


9) Top-stitch around edges if you wish. You can also top-stitch in the petals as in this photo.
10) Make a cup of hot tea and enjoy your mug mat! A set of 4 wrapped up (or even one), is a very nice gift!

Back of Mug Mat. FreeSpirit Fabrics, Tim Holtz.
Now, it is "time" to relax.... or make more mug mats, which I also find relaxing (after the first one).
Tuesday, October 25, 2022
Pretty Smart Apron Costume HACKS & Pumpkin Cookie RECIPE!
Hi Quiltsmarties....
These were SO FUN, I wanted to share again
this year! Let us know if you made a
costume from our Pretty Smart Apron - we would LOVE to see a pic! Share it on your favorite social media spot!
Take Care & Enjoy....
Mattie
Home for Halloween Fun: Pretty Smart Apron Hacks & Pumpkin Cookie Recipe!

Home for Halloween Fun!
Reversible, darling apron that can be made into a quick Halloween costume or play clothing!
See a recording of this project on Facebook LIVE (October 8, 2020).
DOROTHY:
Model: Mattie, Quiltsmart President & Founder, Creative Director, Bend, Oregon
Base Outfit:
White t-shirt or blouse
Jeans or skirt
Attributes of Dorothy:

 White Buttons.
Blue and white checked dress.
Two white buttons on the dress at the waistline.
Red shoes.
Basket with Toto dog.
Pigtails.
Sewing Variations:
I cut the ties at 4" wide x 36". A little wider so they are more of an accent. Turn with a Fasturn #6.

Barmop
cream towel takes the place of the reverse skirt.The Dorothy side has
the same fabric as the bib top, which was made from kitchen cloth
napkins.
Embellishments for Apron:
Reverse side is sheep print fabric. I raised them for 8 years, and still are very fond of the sweet creatures.

Gathered skirt. The "real" Dorothy had a smooth waistline, probably a bias cut, but gathered was easier for this rendition
WITCH:
Model: Kathleen, Quiltsmart Enthusiast, Kensosha, Wisconsin

Base Outfit:
Black leggings & skirt or dress.
Black long sleeve top.

Attributes of witch:
Black Hat
Black outfit
Broom
Accessories:
Colorful socks
Witch hat
Broom. 
Embellishments for Apron:
Purchased embroidered towel with Halloween motif.
BEE:
Model: Terri, Quiltsmart Customer Service, Johnstown, Pennsylvania

Base Outfit:
Black Leggings.
Black Long Sleeve top.

I stitched (4) 3.5" strips of gold and (5) 2.5" strips of black together to make the fabric for the bib front.
Attributes of Bee:
Gold and black body
Antenna
Embellishments for Apron:
Striped fabric OR sew stripes together for front.
SCARECROW:
Model: Theresa, Quiltsmart Sewer, Redmond, Oregon

Jeans & long sleeve t-shirt or flannel shirt.
Sewing Variations:
None. The reverse side can be seasonal or a motif - anything you like!
Attributes of Scarecrow:
Flannel Shirt
Torn Pants
Hay from neck, arms, feet.
MERMAID:
Model: Coco, Quiltsmart Enthusiast, Minneapolis, Minnesota
 Base Outfit:
 Shirt to match skin tone.
Shorts, leggings, or jeans - colors from the apron fabric or skin tone.
I used 7/8" twill tape for the ties - super quick & easy!
Tail:
Glittery fabric, full width folded in half and gathered. We zigzagged
across the gathers, then attached with a safety pin to the other side.
Easy to put on, and to take off! You could make a longer tail to cover
her feet, but we kind of liked the little feet showing. Our mermaids
have feet under their tails!
Reverse side was made into a Snow White apron - by simply using a yellow bar mop for the skirt, blue and a red sash on top. I sewed the red sash to the blue top before making the bib. I also put the mermaid fabric and the yellow barmop right sides together, stitched edges, turned, zigzagged the top, then put into the bib apron top as one piece.
If
you know the apron is for a child, make the bib the “shorter folks”
length.... 7-8 yr old. Once made, the sides of the bib can be tucked
under if necessary.
For
a tiny tot, ..... you would need a smaller apron. You could try
forming the Market Bag into a costume, using the dress variation in
those instructions.


Attributes of Snow White:
Blue top with red sash, large white collar.
Yellow skirt.
Black hair with red bow.Birds light on her finger.
Base Outfit:
Blue puffed sleeve blouse or t-shirt.
Jeans, or yellow skirt, pants, or leggings.
MINNIE:
Model: Sue, Quiltsmart Sewer and Consumer Sewing Consultant, Pennsylvania

Base Outfit:
Black Leggings & skirt.
Black Long Sleeve top.
OR, dress and stockings.

Barmop red towel takes the place of the skirt.
Attributes of Minnie:
Shirt:
Red fabric, white dots. Skirt: Polka Dot (I flipped that for this
apron because I like the towel sewn right in to the apron.
Red polka dot bow. I made a bow and tied it to a headband.
Yellow Shoes
White Gloves

Purchased ruffle trim on the bib top to give a puffed sleeve effect.
Eyelet around the pocket.
Chocolate print fabric is on the reverse side!
COWGIRL:
Model: Lavelle, Quiltsmart Social Media Manager, Bend, Oregon

Jeans
Western Shirt
Boots
Attributes of Cowgirl:
Shirt:Western style.
Cowgirl hat.
Western boots. 
Sewing Variations:
I used 7/8th" twill tape for the apron ties - quick & easy!  Fringe was added on the apron and skirt (towel).
Barmop blue towel takes the place of the skirt.

Embroidery added at the top of the apron.
I made a fake placket in the front before I made the bib. After bib was done, I added snaps to the placket.

Pockets could be added from old jeans!
I hope you enjoyed our Apron Hacks!
Below is a hack on my mom's Pumpkin Cookie Recipe. I made it a bit simpler!
Take Care & Be Safe,
Mattie
PUMPKIN COOKIES

Makes about 4 - 5 dozen.
Ingredients:
1 cup butter
1 15 ounce (medium) can pumpkin
2 teaspoons EACH of baking soda, cinnamon, vanilla
2 tablespoons baking powder
2 cups sugar
4 cups flour
1 cup chopped nuts
1 cup raisins
Instructions:
Mix the first group of ingredients with mixer, then add nuts and raisins with spoon. Drop by heaping teaspoonful on ungreased cookie sheet (don’t forget the parchment paper!). Bake at 350° for about 12 minutes.
Let-us suggest:
Walnuts, pecans, dried cranberries, or white chocolate chips.
Some “Pumpkin Cookie” lovers like to frost the cookies with Cream Cheese Frosting. That can be purchased by the “can” and kept in your pantry until ready to use.
Sunday, March 20, 2022
March Baskets! Spring is in the air and on the wall quilt!

My Midwestern upbringing has me craving for specific spring flowering branches. The kind of made by our resident artist Mother Nature that have slightly twisted branches, simple charm, and beautiful delicate blossoms...keep reading...
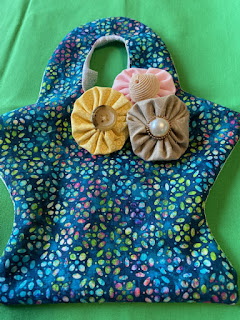 |
| LOVE the buttons as flower centers! |
My friend, Mariann, Carmel, Indiana, sent me pictures of her baskets and yo-yos that she is making- all scraps- don’t ya love it! She is using vintage buttons for the flower centers. Love it!
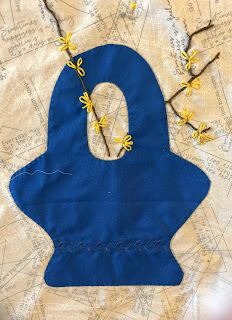
I was reminded of the baskets I started last year. I got them out and decided I was going to add a twist from Mama N.
I’ll post more embroidered flowers as I get them done & more from Mariann (hmmm, a completion challenge?). I used couching (stitching over embroidery floss or pearl cotton) to form the branches, and the lazy dazy stitch for the flowers. I did an internet search for "flowering spring branches" - to see what the branches looked like, for example... how many petals in a "Forsythia" bloom - 4.
TIP: Best to have a large-eyed needle and/or a needle threader.
Click here for instructions to make these adorable Baskets & Yo-yos! There is a pattern for the quilt also, by Cindy Claycamp!
enjoy & take care,
love,
Mattie
Subscribe to:
Posts (Atom)