
 Thumbnail Irish Chain Quilt
This sweet little quilt is big with Irish charm! Each square finishes at a half inch, about the size of a thumbnail (at least mine). I am holding the quilt with just one hand to illustrate the size of the squares. I must say, the nail color is seasonally appropriate too!

MATERIALS:
A variety of green and white fabrics.
Quiltsmart 1" grid, 1 panel. DO NOT CUT THE PANEL!
I made 8 blocks, so a total of
(72) 1" green squares

(32) 1" x 3" white rectangles.
(7) 5" white squares. You could cut (175) 1" squares, but that is a lot of little squares to cut when 7 big ones will do. Though, if you are making a scrappy background, you will probably want individual squares. See Tips above.
TIPS for sewing the tiny 1” grid (Instructions below.)
(General Instructions for using the grids are included with the 4-panel interfacing packs.)
- Use a scant 1/4” seam. The 1” grid will theoretically finish at 1/2” - therefore, if a full 1/4” (or wider) seam is taken, it will take up the whole back of the 1/2” finished square and be bulky.
- Use the whole panel of interfacing for this specific quilt.
- It is a bit easier to place the squares if you cut a scant square - just a hair under 1". It's always good to practice with a small grid first to learn the method and try the tips.
- Squares can be cut individually OR cut in groups where possible. If you are using the same color background, it is easy to cut in groups. If you wanted to use a lot of scraps in the background, you may want to cut individual squares.
- Sew right through the alternate square.
- Check the first rows of seams that you sew before you clip the intersections - this way if any of the tiny squares fell off or did not get sewn properly (didn't get "caught"), you will be able to fix them - it is much harder to fix that if you have already sewn the cross seams.
- Back-stitch at the ends!
- I clipped the intersections, but I still stitched the seams all in one direction rather than pushing one up and one down. With this tiny square, it is quite tedious to push one up and down. But, the clipping actually helps give a bit of ease in each seam, making it easier to sew all in one direction.
- I like to make the opening in the back, by either making a pleat, then slitting the underside of the pleat OR Sew 2 fabrics together, leaving an opening in the center for turning. This way you can stitch all around the quilt, making the edges smooth.

Place and fuse WRONG side of squares to ROUGH side of interfacing - fuse the entire panel. Use an applique pressing sheet to help hold the squares in place while you fuse. This little Flat is helping to fuse using the applique pressing sheet (smart Flat!).


Ready to sew! See the "alternate" squares (5")?

The whole piece before sewing.


After sewing the first set of rows, the piece will look stretched out. Keep going!
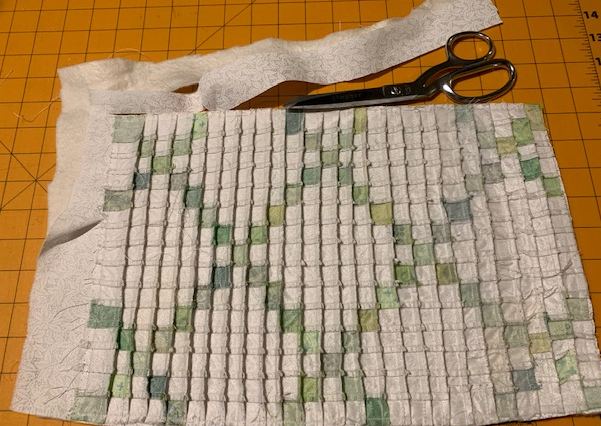
IMPORTANT:
Clip each intersection TO the stitching. (See Tips)
Stitch the rows going in the other direction. (See Tips)
Press seams in the same direction.

The Flats pack - super cute Flat dolls!
Look for our larger size Irish Chain soon (2.5" cut squares)!
Happy Lucky Day,
Mattie